
We participated in activities such as loom weaving, grinding apples for cider,


 churning butter, dipping candles,

writing with quills and ink,

and trying to stay cool in the 95 degree heat wave we had this week (it was over 100 at home). I felt bad for the folks in their heavy costumes ~


I finished this rug for a friend, better not say too much as she might figure it out, ahem, but it's done in time, yippee! With a few of you asking about the how to's on these rugs, I'm sharing the simplicity of their construction.


On the blue and green rugs I used cotton yarn, the weight that you use to make the little washcloths or dish cloths, three threads at a time.
I used one skein of yarn from start to finish to keep the unity of color in it, but I was using up scraps of yarns for the most part.
It's all single crochet.
 This multi colored rug is all acrylic, and I used 4 threads. The full skein I used was a variegated one that went from burgundy to hot pink, and I was using a beige to try to tone it down a bit-!
 The hook is a size P. It came packaged with a larger Q hook, the size I use in rag rugs.
I chained 20 to 30 loose chains, and single crocheted around both sides. I added 3 or 4 stitches to the ends each time around, unless I felt it was looking ripply, and then I'd go around once and not add any stitches at all!

I would also put the added stitches at different intervals on the ends, never just in the center of the end, so that the holes didn't show up in a pattern.
Edited to add:


1. 2. 3.
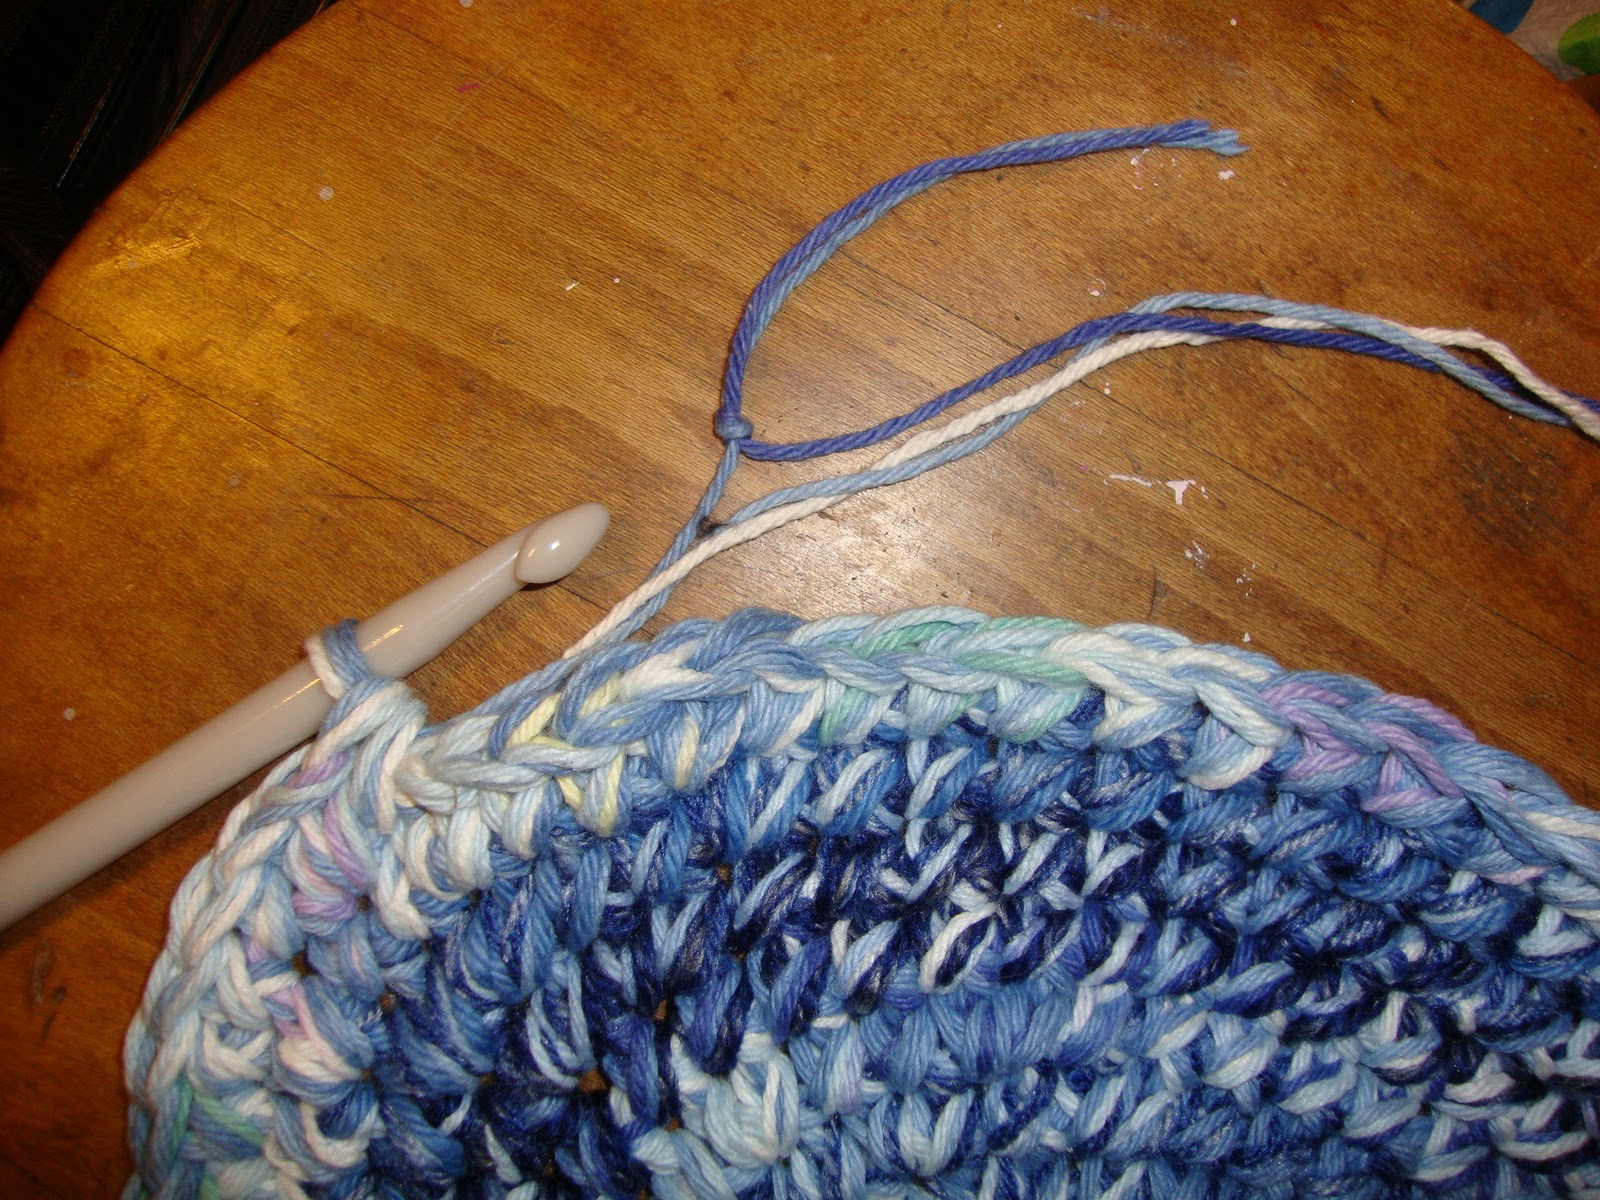
I was asked how I tied on the color/yarn changes.
- I knot about a 3 inch tail from both the leader and the ender thread.
- add the next stitch
- and pull so the knot is tucked inside the stitch (it doesn't always work out perfectly!) The tails are laying along the edge of the rug-
- and are covered over with your stitches as you go
- until you don't see them any more! By leaving the tails long, they are well anchored.


4. 5.
See? not a tough "THIS IS HOW YOU MUST DO IT" set of rules.
 Here are three of Mom's rugs.
 This one is mostly white acrylic
with a chocolate brown
cotton crochet thread
(what I call doily weight),
I think she used 4 threads.
( I'm sorry I didn't wash before pictures, they're getting washed now!!!)
Can you see the variety of thread weights in this rug?
These first two were gifts
Mom recently made,
on our trip home this summer.

And seriously, Mom uses Anything and mixes Everything, including the smaller doily threads in with acrylics, and they turn out kinda cute.
Hope you all are having a good weekend! I still need to get to my studies, and next time, I'll share what Ginny and I did today...! Here's the hint ~

"This is the day which the LORD hath made; we will rejoice and be glad in it." Psalm 118:24


Oh WOW...what a fun day for the kids. LOVE those rugs.
ReplyDeleteLooks like a great field trip (except for the heat) and I love the rugs! Thanks for sharing the photos AND the instructions.
ReplyDeleteEnjoyed your outing. Have you ever used strips of fabric? I used to make both kinds when I was younger and now you have me wanting to make some now.....
ReplyDeleteThat is a cool field trip. Thank you for giving us your instructions on the rugs. I really like them. When you switch yard colors, how do you attach the new yarn?
ReplyDeleteYou would have to give directions, wouldn't you? Now I'm going to have to make one of those rugs... I LOVE them!!! Michaels here I come!!!
ReplyDelete:)
Looks like a great field trip! I helped make apple butter once! It was so good fresh and hot from the kettle! Love your rugs too! :0)
ReplyDeleteThank you for the how-to on the rugs! I'm home schooling my daughter now so we are going to give it a try between lessons. I love the field trip photos! What fun!!! Thank you for sharing those as well.
ReplyDeleteWOW! Those rugs are awesome! I always wondered how that was done, but never knew anyone who knew. Now, if I decide to make one, I'll know who to ask. :-)
ReplyDeleteLooks like your 2nd graders had a great time!
LOVE those rugs.They really are so beautiful. The colours are so pretty!
ReplyDeleteI get a real kick out of seeing kids enjoy learning.
Love those rugs! I'll have to look for P and Q hooks next time I get to a craft store.
ReplyDeleteYour field trip sounds wonderful, despite the heat. I confess I immediately wondered if they kept the cream at a temperature to prolong the making of butter since there were so many kids to try it. (If it's at 50 degrees F., it becomes butter in no time!)
Having your tutorial on the crochet to make the rugs is great! I don't know if I'll ever get around to trying it out but I know I'd love to have the rugs if I ever do. I have so many things go on right now that I can't add another. Maybe eventually tho. Yours are just beautiful, well done!
ReplyDeletePokey,
ReplyDeleteWhat a fun trip - it looks like your 2nd graders really had fun! And oh, those rugs ---- I just swooned!!!
The field trip looked like so much fun! Crochet looks fun as well, but I don't need another item to do..
ReplyDelete